
Rear
Strut Conversion
Ground-Control Coilover Conversion
 I
hate having a car that's not upgradeable so I wanted to do something to it that
would fix it for a long time. The OEM struts on the Celica All Trac are
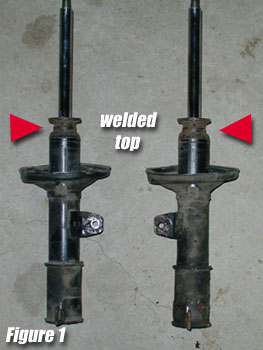
welded at the top so they are not servicable. In order to get new ones,
you have to replace the whole strut and that is not cost effective. Figure
1 shows what the stock struts look like. These are the ones off my car.
I
hate having a car that's not upgradeable so I wanted to do something to it that
would fix it for a long time. The OEM struts on the Celica All Trac are
welded at the top so they are not servicable. In order to get new ones,
you have to replace the whole strut and that is not cost effective. Figure
1 shows what the stock struts look like. These are the ones off my car.
The front struts however are pretty standard Toyota issue. They have a threaded top that you just unscrew. You can then just yank out all the old shock parts, oil, and whatever else was in there and drop in a new insert. Easy as pie.
 So
here's the deal with the rear struts. First you have to drill a vent hole
in the bottom. This may be an optional operation, but Koni recommends
it. The hole is just to vent the extra pressurized nitrogen or whatever
gas they put in there to keep the shock oil from boiling. About a
1/8" or 3mm hole should suffice (see Figure 2). Keep some rags handy
because you may get some oil squirting in your face. As with any project
involving a drill or flying fluids, wear safety goggles.
So
here's the deal with the rear struts. First you have to drill a vent hole
in the bottom. This may be an optional operation, but Koni recommends
it. The hole is just to vent the extra pressurized nitrogen or whatever
gas they put in there to keep the shock oil from boiling. About a
1/8" or 3mm hole should suffice (see Figure 2). Keep some rags handy
because you may get some oil squirting in your face. As with any project
involving a drill or flying fluids, wear safety goggles.
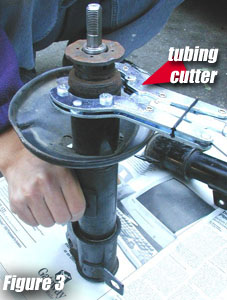 Now,
using a tubing/strut cutter capable of 2" diameter pipe cutting (available
at most hardware stores for around $15-$80), cut off the top part of the strut
just below the ridges of the weld. You'll need enough space for the tubing
cutter to ride around the strut smoothly as some cutters have wider
rollers. I find that if you do this while the strut is mounted laying down
horizontally, it is easier to keep the cutter going around straight. Be
careful not to cut several rings around the tube instead of one.
Now,
using a tubing/strut cutter capable of 2" diameter pipe cutting (available
at most hardware stores for around $15-$80), cut off the top part of the strut
just below the ridges of the weld. You'll need enough space for the tubing
cutter to ride around the strut smoothly as some cutters have wider
rollers. I find that if you do this while the strut is mounted laying down
horizontally, it is easier to keep the cutter going around straight. Be
careful not to cut several rings around the tube instead of one.
When you are done cutting, file off any burrs on the interior walls of the tubing. You will be welding on here, so you can also do some prep work like putting a 45 degree chamfer on the outside edge and removing the paint within an inch or so of the cut. A grinder to make the chamfer and wire wheel to remove paint are more than adequate--you could also use a file and sandpaper.
 Now
you'll want to get your threaded top ready. You may need up to an
additional 2-3 inches of tubing with the threads intact to make this all work,
so make sure you measure what you're doing. Here's how you measure:
With the strut tube cut and deburred, take a fresh strut insert (identical to
the front ones you can get for the ST165/ST185/MR2 SW20 & SW21) and drop it
into the modified housing. I use KYB AGX part number 765015 You'll notice the insert sticks out quite a
bit. You don't like that (trust me, you don't). So what you want to
do is weld on enough of the threaded top to be even with the top of the
insert. It might pay to see exactly how the insert's capture nut fits on
the insert, but chances are it hangs down around the outside about a half inch,
so if the tops of the tube and the insert are even, you're in business.
See Figure 4 for how it should look. Cut
the threaded portion to fit where you want it and dry fit it to make sure it's
right. For what it's worth, you can get pre-fabbed tops that are already
threaded (not rusty crusty like a pair of donor struts) from
Ground-Control for a few bucks.
Now
you'll want to get your threaded top ready. You may need up to an
additional 2-3 inches of tubing with the threads intact to make this all work,
so make sure you measure what you're doing. Here's how you measure:
With the strut tube cut and deburred, take a fresh strut insert (identical to
the front ones you can get for the ST165/ST185/MR2 SW20 & SW21) and drop it
into the modified housing. I use KYB AGX part number 765015 You'll notice the insert sticks out quite a
bit. You don't like that (trust me, you don't). So what you want to
do is weld on enough of the threaded top to be even with the top of the
insert. It might pay to see exactly how the insert's capture nut fits on
the insert, but chances are it hangs down around the outside about a half inch,
so if the tops of the tube and the insert are even, you're in business.
See Figure 4 for how it should look. Cut
the threaded portion to fit where you want it and dry fit it to make sure it's
right. For what it's worth, you can get pre-fabbed tops that are already
threaded (not rusty crusty like a pair of donor struts) from
Ground-Control for a few bucks.
Prep the threaded top with a chamfer and remove the paint like you did above and have them welded on STRAIGHT (tack weld with the insert inside if you have to--remove the insert to weld or you'll possibly ruin it with the heat). A muffler shop or welding shop should be fine or you can do it yourself. Good welds wont need to be ground down. Grinding is detrimental to the struts' strength. Once they're all done clean them up with a wire brush and paint them (prevents rust ya know). Here's what they'll look like (Figure 5):

An additional piece of advice: not all aftermarket inserts have the same diameter mounting at the top of the shaft. My KYB AGX adjustable shocks were slightly larger than the holes in the upper perches on the rear. The fronts (since they were a Toyota front application I assume) fit fine. All this means to you is that you might have to drill out the bushing in the top body mount a little. I think they were just a hair under 5/8" (16mm). I also needed a large washer under the top nut on the shaft since the bushing on the body mounts was a tiny bit shorter than the length of the bearing shoulder on the shaft. No big deal.
Ground-Control Coilover Conversion
Now that I have some usable rear struts, why stop there? I didn't want to so I got on the phone with Jay at Ground-Control and discussed my options. After convincing him to do another kit for the All Trac, we decided that 500 lb/in springs up front and 325 lb/in springs in the rear were a good start (assuming front corner weight of about 1000 lbs and a rear of about 700).
 This kit couldn't be easier to
install. All you have to do is pull the struts off the car and remove the
top nut that holds the spring perch on. Then there are two O-rings that
slip over the strut tube and ride between the strut and the threaded coilover
collar. If you've done the rear strut modification shown above, you will
want to make sure first that the welds don't get in the way of the collar.
If they do, grab a grinder and go to town. Make sure to paint them to
prevent rust.
This kit couldn't be easier to
install. All you have to do is pull the struts off the car and remove the
top nut that holds the spring perch on. Then there are two O-rings that
slip over the strut tube and ride between the strut and the threaded coilover
collar. If you've done the rear strut modification shown above, you will
want to make sure first that the welds don't get in the way of the collar.
If they do, grab a grinder and go to town. Make sure to paint them to
prevent rust.
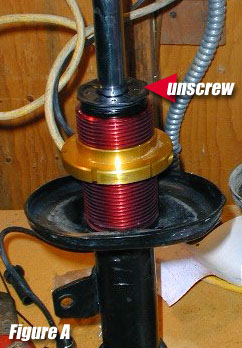
You may have to grind down the welded top of your stock rear struts to get the collar on, but if you have inserts, you can simply unscrew the insert's capture nut and stretch the O-rings over the tube and slide the threaded sleeve onto the strut tube and then replace the capture nut. See Figure A for a quick look.
Once you get the collar on, you're home free. Just remove all the rubbery crap that is on the OEM struts and put it somewhere safe like your "box of miscellaneous parts off your car" or the "garbage can" or whatever. I saved mine in case I want to sell the car some day and keep the coilovers.
 Now
you can slide the bump stop on to your strut shaft again if it's not already
there. Assuming your springs are stiffer, you can cut a third to a half of
the bump stop and get slightly more travel out of your suspension without
hurting anything. Slide the spring on to the lower threaded perch and
follow it with the upper perch supplied with the kit. You will be removing
your OEM upper perch from both front and rear strut assemblies. You can
put these parts in the box with the rubber crap mentioned above. Figure B
shows the details of what you'll put on. Notice the zip tie in Figure
B. This serves to keep the spring attached to the upper perch which will
remain sandwiched between the bump stop (which doesn't slide easily on the
shaft) and the upper body mount. The coil springs will have an easier time
centering themselves around the lower threaded collar than they would the flat
upper perch. If your upper perches don't have holes, you can
probably drill two on opposite sides for the same purpose. Ground
Control's come with them. If you are running tender
springs or helper springs (thank you Eibach for clearing that up!), you
won't need the zip ties since the springs should never be loose in the strut.
Now
you can slide the bump stop on to your strut shaft again if it's not already
there. Assuming your springs are stiffer, you can cut a third to a half of
the bump stop and get slightly more travel out of your suspension without
hurting anything. Slide the spring on to the lower threaded perch and
follow it with the upper perch supplied with the kit. You will be removing
your OEM upper perch from both front and rear strut assemblies. You can
put these parts in the box with the rubber crap mentioned above. Figure B
shows the details of what you'll put on. Notice the zip tie in Figure
B. This serves to keep the spring attached to the upper perch which will
remain sandwiched between the bump stop (which doesn't slide easily on the
shaft) and the upper body mount. The coil springs will have an easier time
centering themselves around the lower threaded collar than they would the flat
upper perch. If your upper perches don't have holes, you can
probably drill two on opposite sides for the same purpose. Ground
Control's come with them. If you are running tender
springs or helper springs (thank you Eibach for clearing that up!), you
won't need the zip ties since the springs should never be loose in the strut.
 Put
the body mount on the strut. Place any washers that go with the front or
rear upper perch on the top of the body mount. Tighten the nut to its
specified torque and adjust the lower perch to a height you think is
comfortable. I suggest you err on the high side because if you go too low,
you'll be fighting to get your jack out from under the car! Figure C shows
a completed rear coilover conversion with the AGX adjustable shock. Big
difference in appearance compared to OEM, BIGGER difference in handling!
Put
the body mount on the strut. Place any washers that go with the front or
rear upper perch on the top of the body mount. Tighten the nut to its
specified torque and adjust the lower perch to a height you think is
comfortable. I suggest you err on the high side because if you go too low,
you'll be fighting to get your jack out from under the car! Figure C shows
a completed rear coilover conversion with the AGX adjustable shock. Big
difference in appearance compared to OEM, BIGGER difference in handling!
You can also see how low the car is now with them adjusted down most of the way. I didn't want to go too low since I hate scraping and having to go slow over bumps in a rally car!
Useful Links:
Ground
Control Suspension Systems - Supplies threaded tube tops, coilover
conversion kits.
Eibach - Manufactures of ERS springs, have
some good info on their site under "motorsports".
KYB - Makers of AGX adjustable shocks.
Tire Rack - Where I got my shocks cheap.

celica index | car history | links | y8s home